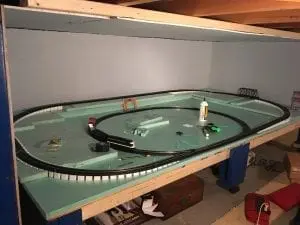
The entire HO train layout setup is literally assembled on hands and knees! First built a 4’ by 8’ table on 6 sets of casters that could move around while building and for maintenance. Foam board for nearly all the foundation and hills which are easy to work with and mold.
The HO train photo series walks you through the construction of the benchwork, track plan, model train scenery and provides views of the control board as well.
Are you looking for step-by-step instructions on building your very own model train layout? Lets get started…
1. Track Plan and Benchwork

This bare bones view of the overall track plan shows the figure eight loop along with a smaller more circular loop. This type of track plan is ideal for HO scale as the 4×8 ho train layout provides enough space to build multiple loops while still allowing for model train scenery items such as tunnels and bridges.
2. Trackwork and Wiring of HO Train Layout

Laying trackwork and wiring the HO train layout is the next step after building the benchwork and track plan. The foam bed was built into six different parts for easier assembly and elevated to allow for the model train scenery such as hills to be proportional to the overall layout.
3. Constructing an HO Model Train Tunnel

Model train tunnels are needed when building scenery that contains mountains or larger hills. This oval track plan in this 4’x8′ HO train layout allows for the locomotives to journey across the entire landscape and adds a level of realism that helps encapsulate the overall theme. Keep in mind that all gradients and curves should be accounted for and laid out on before constructing the tunnel.
4. Model Train Scenery Ground Cover

The bottom right corner of the layout is using medium ground cover for model train scenery. The unfinished view will eventually contain the hill with a tunnel. The substrate product is called Woodland Scenics Turf Fine Green and helps add course texture to the scenery without causing a mess of a low ground spray.
5. Mountain Model Train Scenery

Adding model train scenery including mountains, hills and rock edifices are an excellent way to provide more detail to the overall layout. Attaching a bridge to the model train mountain and running track on either side of it along with a basic river bed below provides incredible detail.
6. Model Train Tunnel Final View
This angle provides a dramatic view of the entire model train tunnel including the red brick detail and ground turf. Similar to other model railroads, this layout is a work in progress and requires installing more track to allow locomotives to go through the tunnel.
7. 4×8 HO Train Layout Control Board

The control board provides a simplified version of the HO scale mainline and branches. It’s powered by DCC and the throttle allows for easy control of the locomotives and engines across the board. It also contains basic electrical switching capabilities and location based turnouts.
This entire series shows a detailed view of an HO train layout and provides different angles of the scenic views, which include a mountain, tunnel and ground cover. Everyone has their own theme to pursue when building a layout but this shows what can be done especially with an HO scale layout.
Here are Free Resources to Help Build Your Model Railroad
- Top Rated Track Plans for Model Train Beginners
- The ONLY Two Things EVERY Model Train Beginner Must Know..!
- Beginners Getting Started Guide
- 5 Tips to Avoid Derailments, Erratic Stops, and Costly Building Mistakes
- DCC Wiring for Beginners
- Choosing the Right Scale with Limited Space
- The ONLY Time Tested Way to Lay Model Railroad Track
- Installing Model Train Buildings and Roads
- Model Train Layout Sharing w/ Grandkids (Open Letter)
- How to Build Model Train Hills & Trees Perfectly Every Time
- Top 3 Costly Model Train Mistakes & How to Avoid Them
- How to Avoid Costly Mistakes When Building Model Railroad Benchwork
